The OAuth 2.0 implicit grant flow is great way to handle authentication between a client JavaScript single page web app (SPA) and a web API. For example: a React or Angular web app that needs to authenticate users and then have those users call an authorized ASP.NET Core Web API.
Azure AD and the Microsoft identity platform have well established patterns and support for this workflow. In this blog post I will break down an end-to-end example that includes enabling this flow for AAD users with the following technologies: an Azure AD App configured with role-based access control (RBAC) claims, client side code leveraging React and ADAL.js, and server side code leveraging ASP.NET Core.
Important: If you need to support non-Azure AD accounts (ex: personal Microsoft accounts), you will need to use the MSAL.js library and the new v2 Microsoft Identity Platform. The instructions in this post reflect the setup to authenticate Azure AD users from ADAL.js.
IMPORTANT UPDATE: September 2020. OAuth now recommends using the Authorization Code flow instead of Implicit Grant flow for browser based applications. MSAL.js 2.0 has support for it now (read more here). New tutorial post is available here: https://keithbabinec.com/2020/09/27/oauth-2-0-authorization-code-flow-with-a-react-spa-asp-net-core-web-api-rbac-roles-and-msal/
Part 1: Configure the Azure Application
Create the app registration
- Login to the Azure Portal.
- From the Azure Active Directory section in the portal, click on App Registrations, then click New Registration.
- In the details:
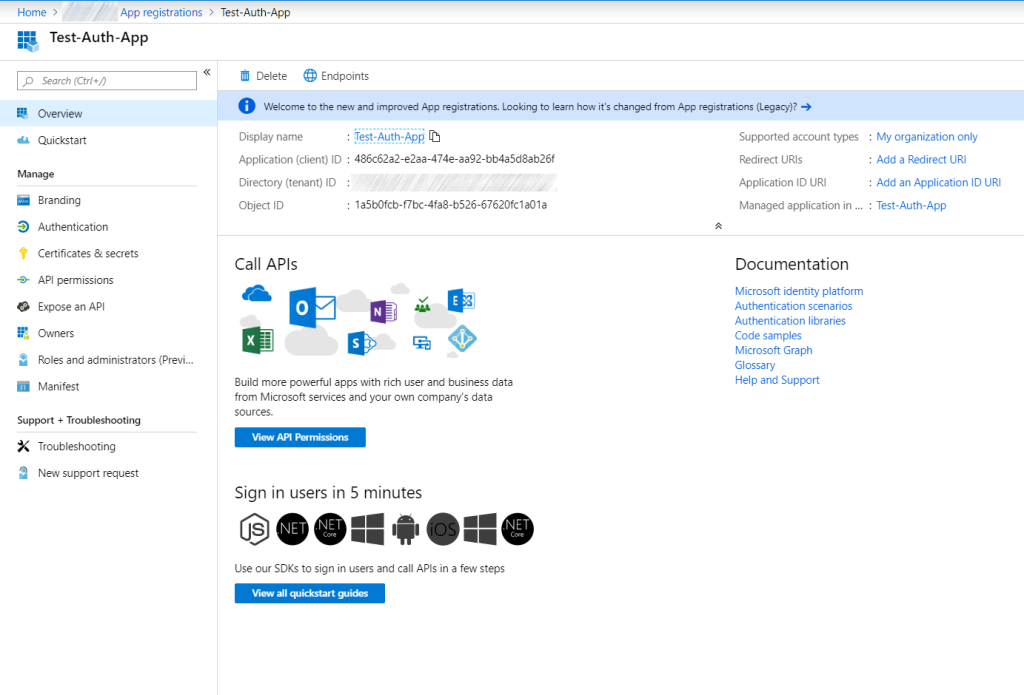
- Provide a friendly name for your application. I’m calling mine Test-Auth-App.
- For supported account types, select Accounts in this organizational directory only.
- The redirect URI can be left blank now and filled in later with the web address(es) for your client side web app.
- After creating the app registration, take note of the Application (client) IDs and the Directory (tenant) IDs on the overview page. They will be needed in later steps.
Configure the app manifest
- Click on the Authentication section in the app registration.
- Enable implicit grant flow by checking the Access tokens and ID tokens check-boxes, then hitting Save.
- Click on the API Permissions section in the app registration.
- Remove the default graph API permission that was applied, since it isn’t needed. Click on the permission and then hit Remove in the flyout window.
- Click on the Manifest section in the app registration.
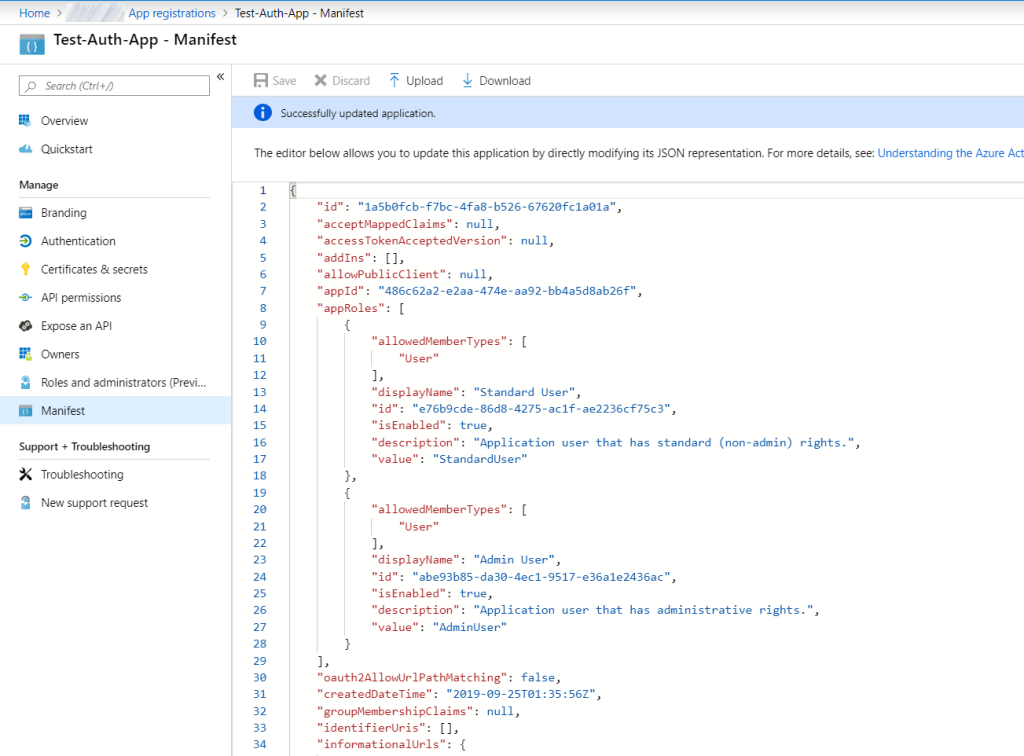
- Inside the appRoles property in the manifest, specify one or more custom defined RBAC roles (example below).
- These RBAC roles are defined by you and are scoped just for this app registration. Generate a new unique guid for each role you add. For my sample app I configured two roles: AdminUser and StandardUser, but these can really be any role description names that make sense for your application.
- See this guide for more information on how to create custom roles.
- After you have added your custom app roles to the registration, hit Save.
// example custom RBAC role defined in the app manifest
{
  "allowedMemberTypes": [
    "User"
  ],
  "displayName": "Admin User",
  "id": "abe93b85-da30-4ec1-9517-e36a1e2436ac",
  "isEnabled": true,
  "description": "Application user that has administrative rights.",
  "value": "AdminUser"
}
Configure the Enterprise Application
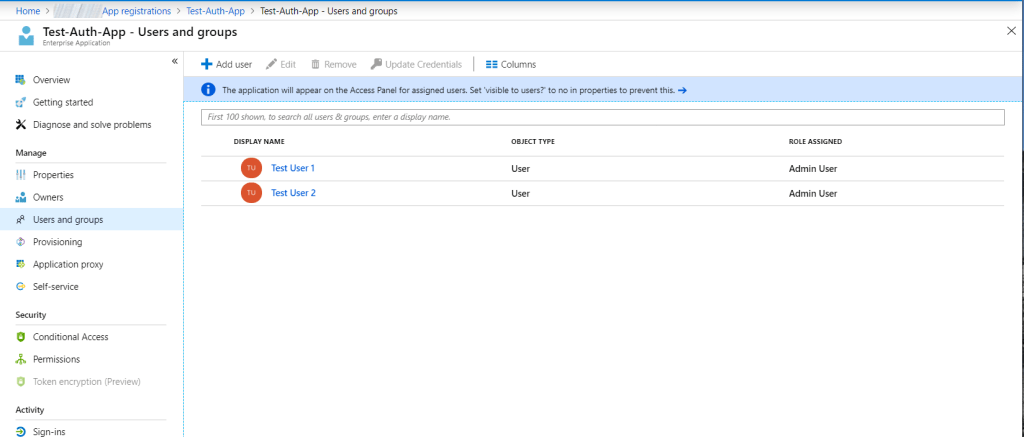
- Each app registration has an associated/linked object defined in Azure Active Directory’s Enterprise Applications view. This is where we will actually assign users or groups to the RBAC roles we have created in the previous step.
- To find the Enterprise Application object, click on the Managed application in local directory link from the app registration overview.
- Click on the Users and Groups section.
- Click Users and the flyout menu will allow you to pick from users or groups in your directory. Select the principals that should have access to the app role.
- Click Select Role and then you should be able to select the custom roles you created in the app manifest.
- After selecting both users/groups and the roles they should be assigned to, click the Assign button to grant the permissions.
Part 2: Configure server-side (web API) code
Project setup
For the sample project I have created a new ASP.NET Core (2.2) Web API project in Visual Studio 2019. The full source code is in a link at the bottom of this post– so we will just look at the relevant snippets here.
The really cool part about doing this in ASP.NET Core is that they already have have baked in support for the type of authentication we are about to enable, so we don’t need to install additional packages.
Startup.cs
In the ConfigureServices() and Configure() methods of the Startup.cs file, we need to add an authentication service. This ends up getting injected into the request pipeline. We configure the options for JwtBearer tokens, and specify the accepted audience and issuing authority. This authentication service automatically handles bearer token validation for us. This confirms that the token we receive from the client is valid and has not been tampered with.
public void ConfigureServices(IServiceCollection services)
{
  // other services bootstrap code trimmed for clarity
  // see full source for complete example.

  services.AddAuthentication(options =>
  {
    options.DefaultScheme = JwtBearerDefaults.AuthenticationScheme;
  }).AddJwtBearer(options =>
  {
    // note: the tenant id (authority) and client id (audience)
    // should normally be pulled from the config file or ENV vars.
    // this code uses an inline example for brevity.

    options.Authority = "https://login.microsoftonline.com/<tenant ID>";
    options.TokenValidationParameters = new TokenValidationParameters()
    {
      ValidAudience = "<AAD app client ID>"
    };
  });
}

public void Configure(IApplicationBuilder app, IHostingEnvironment env)
{
  // other app pipeline builder code trimmed for clarity
  // see full source for complete example

  app.UseHttpsRedirection();
  app.UseCors("CorsPolicy");
  app.UseAuthentication();
  app.UseMvc();
}
Controller authorization
Once we have an authentication service configured in the request pipeline from the previous step, we can add the user authorization code. Thankfully ASP.NET Core makes this very simple via attributes. We can add Authorize() attributes to the controllers or controller methods to authorize endpoints and make them require a specific RBAC role that we defined early.
This is what it looks like to authorize individual controller methods with the two RBAC roles I created in the app manifest (including one open route with no authorization required).
[Route("api/[controller]")]
[ApiController]
public class TestController : ControllerBase
{
  // this is a sample endpoint that requires 'AdminUser' role access,
  // as defined in the AAD app registration manifest and assigned via AAD
  // users and groups.
  [HttpGet()]
  [Route("admin")]
  [Authorize(Roles = "AdminUser")]
  public async Task<ActionResult<string>> AdminRoleGet()
  {
    return Ok("Successfully called the api/test/admin endpoint.");
  }

  // this is a sample endpoint that requires 'StandardUser' role access,
  // as defined in the AAD app registration manifest and assigned via AAD
  // users and groups.
  [HttpGet()]
  [Route("standard")]
  [Authorize(Roles = "StandardUser")]
  public async Task<ActionResult<string>> StandardRoleGet()
  {
    return Ok("Successfully called the api/test/standard endpoint.");
  }

  // this is a sample endpoint that requires no authentication at all.
  // it is wide open to the public internet.
  [HttpGet()]
  [Route("noauth")]
  public async Task<ActionResult<string>> NoAuthGet()
  {
    return Ok("Successfully called the api/test/noauth endpoint.");
  }
}
Part 3: Configure client-side code
Project bootstrap
For my sample JavaScript application I quickly initialized a new React project with the standard dependencies by using the React project generator create-react-app. Then I removed a bunch of stuff outside the scope of the demo scenario we are walking through. Use NPM to add the ADAL.js package.
Important: If running the sample project, configure the local web server to serve your page over HTTPS, otherwise the callbacks back from the Microsoft identity platform won’t work.
App initialization code
On app initialization (index.js), we check to see if the user context is cached. If they don’t have a valid cached token the user should immediately be redirected to the Azure AD sign-in page. After sign-in the user is redirected from Azure AD sign-in page back to your application– this time with an encoded JWT bearer token in the URL parameters.
Reminder: This is where the URI redirect fields come into play, as configured in the AAD app registration. The originating URL of your client application must match a valid redirect URL listed in the app registration in AAD, otherwise the authentication will not succeed.
If the code is returning from the sign-in callback and has a valid token, then we can call the main entrypoint for the React application.
SECURITY WARNING: Be aware that this JavaScript code sample uses the browser’s sessionStorage to store tokens. This means the token could be extracted if the site is vulnerable to an XSS attack or if untrusted/malicious scripts are executed in your web app. Keep this in mind when handling tokens.
import React from 'react';
import ReactDOM from 'react-dom';
import * as AuthenticationContext from 'adal-vanilla/lib/adal'
import App from './App';

// store the ADAL config:
window.adalConfig = {
  clientId: '<Add your AAD application ID>',
  tenant: '<Add your AAD tenant ID>',
  cacheLocation: 'sessionStorage',
  popUp: false
};

var authContext = new AuthenticationContext(window.adalConfig);

if (authContext.isCallback(window.location.hash)) {
  // this handles the redirect back from the AAD sign-in page.
  // it extracts the hash and processes the AAD token (or error) received.
  authContext.handleWindowCallback();
}

function startApplication(username, token) {

  // render the main application
  ReactDOM.render(<App user={username} bearerToken={token} />, document.getElementById('root'));
}

var user = authContext.getCachedUser();

if (user) {
  let clientId = window.adalConfig.clientId;

  authContext.acquireToken(clientId, function (errorDesc, token, error) {
    if (error) {
      // acquire token failure
      // In this case the callback passed in the Authentication request constructor will be called.
      authContext.acquireTokenRedirect(clientId, null, null);
    }
    else {
      //acquired token successfully
      startApplication(user.userName, token);
    }
  });
}
else {
  // Initiate login
  authContext.login();
}
Reviewing the token
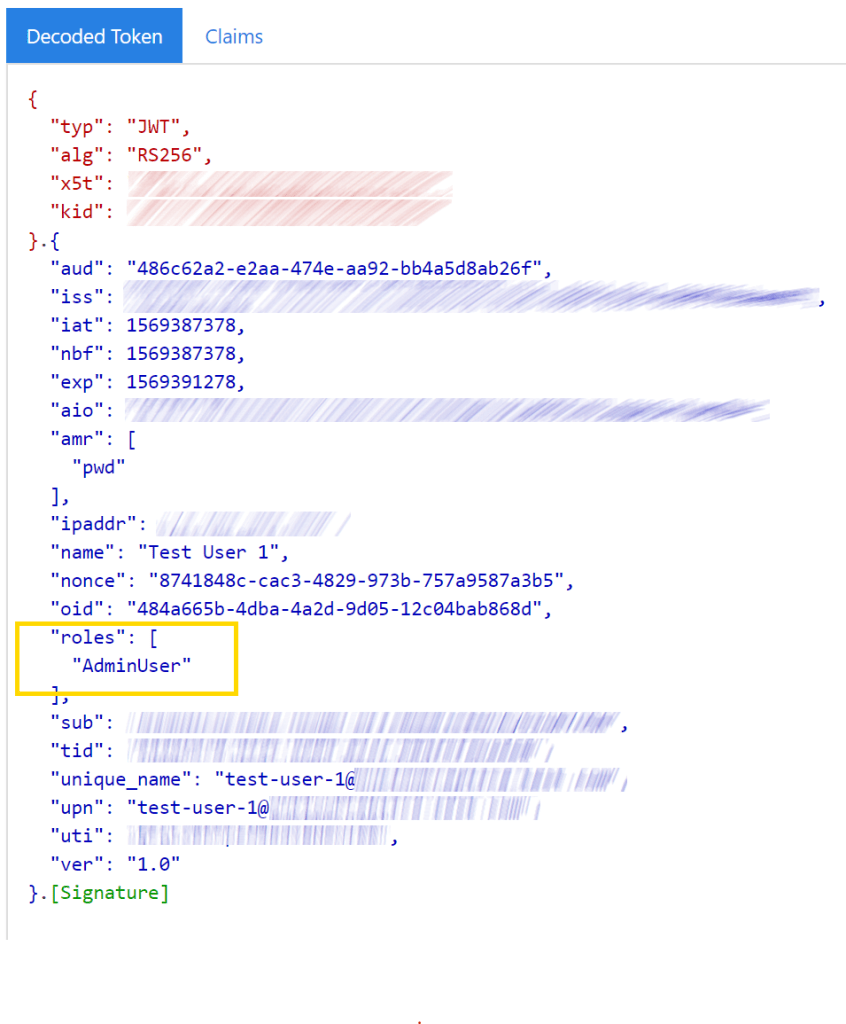
At some point in the process for building your client-side code its helpful to review the tokens you receive from Azure AD or the Identity Platform. The tokens you receive are encoded and signed, but they are not encrypted. This means we can crack them open and take a look to make sure we are receiving the correct claims.
If you set a breakpoint somewhere in the app bootstrap code, you can grab the token string and plug it into a token decoder like https://jwt.ms/.
If you have set up everything correctly so far, you should see your custom RBAC role assignment in the token. Here is an example token generated for my test AAD app:
Calling an Authorized API
After the login() and acquireToken() calls have occurred and you have started your React application, you should be ready to call secure APIs using the JWT bearer token. Supply the token as a header in whatever service/API wrapper code you have. I used the axios package for HTTP calls in the sample project.
If the user is authorized to call the controller route, then the request should proceed as you would normally expect. Calling the route from a user that does not have the ‘AdminUser’ claim (in the case of my sample app) will generate a 403 Forbidden result from the ASP.NET Core Web API. If you try to call the endpoint before you have authenticated (for example by not sending any bearer token at all) then the Web API should return 401 Unauthorized.
The following is a quick mock-up of what the JavaScript would look like to call an API with the bearer token. In the React application you could wrap this code in a class and inject it into your components as needed.
import axios from 'axios';

// abbreviated example
let token = '[my JWT bearer token]'

api = axios.create({
  baseURL: "https://my-api-server-uri/api",
  headers: {
    'Authorization': `Bearer ${token}`,
    'Content-Type': 'application/json',
  }
});

api.get('/test/admin')
  .then(function (response) {
    // handle success
    return response.data;
  })
  .catch(function (error) {
    throw Error('An error has occurred calling the api: ' + error);
  });
Conclusion
In this post we have seen how to create the AAD app registration for the implicit grant flow, and create the custom RBAC roles. We have also seen the snippets for both the client and server side handling of the implicit grant flow.
If you are interested in actually viewing or running the full sample code, the source is posted on GitHub here: https://github.com/keithbabinec/SampleAADImplicitGrantFlow

Just to make sure, you are using the same app registration credentials for your SPA and WebAPI?
LikeLike
Yes, that is correct, it is the same Azure AD app registration used by both.
However I wanted to mention now that Microsoft just came out with new recommendations that SPA’s switch from Implicit Grant flow to use the Authorization Code flow.
I will be making a notice on this post here soon and coming out with a new tutorial for Authorization Code flow in the next couple weeks. You can read more information here: https://developer.microsoft.com/en-us/identity/blogs/msal-js-2-0-supports-authorization-code-flow-is-now-generally-available/
LikeLike
@joris — new tutorial post is available now: https://keithbabinec.com/2020/09/27/oauth-2-0-authorization-code-flow-with-a-react-spa-asp-net-core-web-api-rbac-roles-and-msal/
LikeLike
Waiting for the post on how to setup the Azure AD auth code flow with React and ASP.NET Core
LikeLike
Thanks for the reminder– a little behind schedule but hopefully out soon. I will be working on it this weekend.
LikeLike
@kumar — new tutorial post is available now: https://keithbabinec.com/2020/09/27/oauth-2-0-authorization-code-flow-with-a-react-spa-asp-net-core-web-api-rbac-roles-and-msal/
LikeLike