Today we are going to walk through a helpful modification to the Visual Studio Team Services (VSTS) process and style templates; with the goal of making it easier to find and visualize blocked work.
Note: This post was written right before VSTS re-branded as Azure DevOps. For new instructions for Azure DevOps, visit this link: https://keithbabinec.com/2019/10/08/how-to-visually-highlight-blocked-work-items-on-an-azure-devops-sprint-board/
What is blocked work?
In a scrum or agile setting, ‘blocked’ is the state of a work item that you cannot complete due to external factors. For example, you cannot add a feature because you are waiting for a co-worker to finish an outstanding pull request that your work builds upon. Or you cannot complete a user story because you are waiting on another department to provide a license to a 3rd party API.
It’s helpful for both engineers and product/project managers to identify and resolve blocked work quickly so the sprint can continue. The problem today is that in the default view of a VSTS sprint board, you can’t tell if anything is blocked without diving into each work item.
Updating your view to see blocked work
There are some changes you can make to your VSTS process definition and sprint board styles that allow you to visualize blocked work. It doesn’t require installing any extensions either. There are two phases to the process: modify your work item templates and adding custom style rules.
Step 1: Add a ‘Blocked’ field to your work items
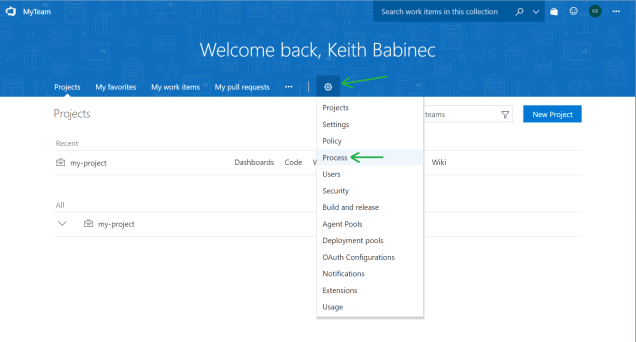
1. Visit the root of your team/collection.
2. Click on the ‘Settings’ gear icon, and click the ‘Process’ menu item. If you don’t see the ‘Process’ menu item, you are likely looking at the Settings menu for a specific project. You need to navigate upwards to the parent/root collection.
 3. On the ‘All processes’ page, you should see existing processes built into VSTS (like Agile and Scrum). You cannot modify those templates. But you can make a new process that inherits from one of those so we can make changes. Make a new process for your team/organization if you haven’t already. Otherwise click the name of the existing process to modify.
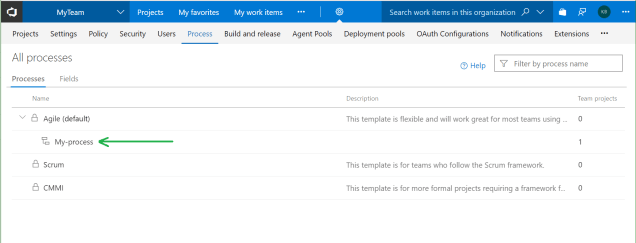 4. Click on the ‘Task’ work item type.
 5. In this view we can modify the template for what options are available on a Task work item. We want to add our ‘Blocked’ field here. Click the ‘New field’ button in the top left.

6. Under the ‘Definition’ tab, select ‘Use an existing field’ to add the predefined ‘Blocked’ field to the Task work item template. Under the options tab on the left pane, set the default value to ‘No’ (we want work items to start as unblocked).

7. Repeat steps 4-6 work the ‘Bug’ work item type as well.
Step 2: Update the sprint board card styles
Now that our ‘Bug’ and ‘Task’ work item types support a blocked field, we need to add the style changes to the sprint cards.
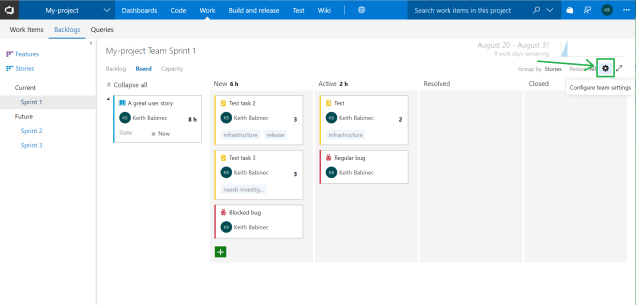
1. In the sprint board view, click on the ‘settings’ gear icon to configure team settings.
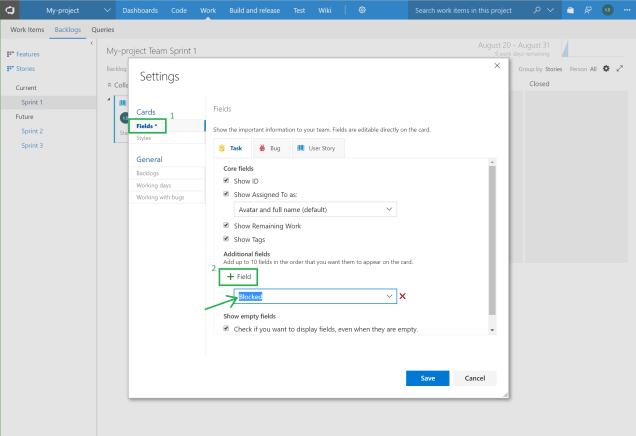
2. In the ‘Fields’ pane from the left side navigation, add the new ‘Blocked’ field to the display card. Perform this action for both tasks and bugs, by clicking on the Task or Bug tab menu items shown below.
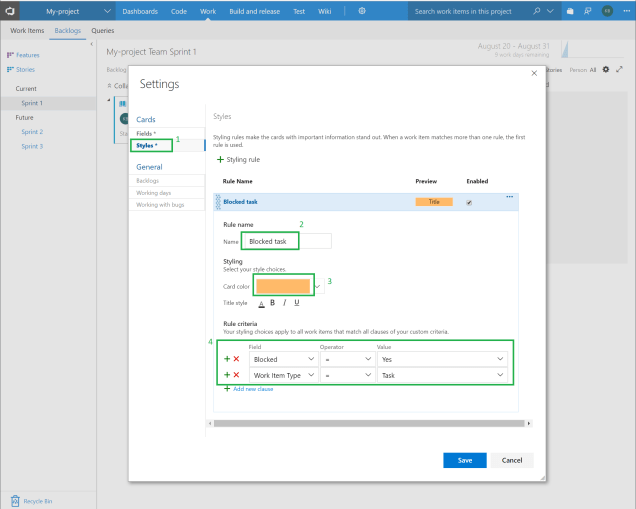
3. Navigate to the ‘Styles’ pane from the ‘Settings’ left side navigation. This is where we can make style rules that indicate a work item tile card should change to a different color when blocked.
The example rule I have pictured below creates a new rule that changes Tasks to orange if blocked. Notice that there are two conditions- one for the blocked field, and one that narrows the rule to just the ‘Task’ work item type.
Repeat the same process for bugs by creating another rule, but select a different color (such as red). Save the changes.
The resulting view
After making the work item template changes and the style card changes, we can open some example tasks or bugs and set the newly added ‘Blocked’ field to ‘Yes’. Then your view should look something like this (below). My example blocked task is highlighted orange, and my blocked bug is highlighted red per the style rules I defined.

